An introduction to Web Components
Imagine you’re building a web application. And you want to add a date picker component to it. Now, you can either build it from scratch or you can use a third-party library like Flatpickr or Pikaday to do the job for you.
But, what if you want to build your own date picker component? What if you want to build a component that is completely custom and unique to your application that can be reused across your application(s), sort of portable and pluggable?
Well, that’s exactly where you can use Web Components.
What are Web Components?
Web Components are a set of web platform APIs that allow you to create new custom, reusable, encapsulated HTML tags to use in web pages and web apps. They are a set of standards-based APIs that can be used to create reusable components using HTML, CSS, and JavaScript.
Web Components are made up of three main technologies:
- Custom Elements: A set of JavaScript APIs that allow you to define custom elements and their behavior, which can then be used as desired in your user interface.
- Shadow DOM: A set of JavaScript APIs for attaching an encapsulated “shadow” DOM tree to an element — which is rendered separately from the main document DOM — and controlling associated functionality. In this way, you can keep an element’s features private, so they can be scripted and styled without the fear of collision with other parts of the document.
- HTML Templates: The
<template>and<slot>elements enable you to write markup templates that are not displayed on the rendered page. These can then be reused multiple times as the basis of a custom element’s structure.
Creating a simple Web Component
Let’s create a simple Web Component that will display a custom message on the page.
First, we’ll create an HTML file called index.html and add the following code to it.
<html>
    <head>
        <meta charset="utf-8">
        <title>Custom Element</title>
        <script src="custom-component.js" defer=""></script>
    </head>
    <body>
        <custom-component></custom-component>
    </body>
</html>
As you can tell, we’ve created a custom HTML tag called <custom-component> which is not a valid HTML tag. But, we’ll make it valid by creating a custom element using JavaScript.
So, let’s create a new JavaScript file called custom-component.js and add the following code to it.
customElements.define('custom-component', class extends HTMLElement {
    constructor() {
        super();
        this.innerHTML = 'Hello World!';
    }
});
As you can tell, we’ve created a custom element using the customElements.define() method. This method takes two arguments. The first argument is the name of the custom element and the second argument is the class that extends the HTMLElement class.
The HTMLElement class is the base class for all HTML elements. It provides properties and methods that are common to all HTML elements.
The customElements.define() method registers the custom element with the browser. So, now, the browser knows that <custom-component> is a valid HTML tag.
We are also setting the innerHTML property of the custom element to Hello World!. So, when the browser encounters the <custom-component> tag, it will render the Hello World! text on the page.
Now, if you open the index.html file in the browser, you’ll see the HTML that looks like this.
<html>
    <head>
        <meta charset="utf-8">
        <title>Custom Element</title>
        <script src="custom-component.js" defer=""></script>
    </head>
    <body>
        <custom-component>
            Hello World!
        </custom-component>
    </body>
</html>
As you can tell, the browser has rendered the Hello World! inside the <custom-component> tag.
Using Shadow DOM
Now, let’s say you want to add some styles to the custom element that only apply to the custom element and not to the rest of the page. You can do so by using the Shadow DOM. You can do so by using the shadowRoot property of the custom element.
Let’s modify the index.html file like so.
<html>
    <head>
        <meta charset="utf-8">
        <title>Custom Element</title>
        <script src="custom-component.js" defer=""></script>
    </head>
    <body>
        <p>Outside of the custom element</p>
        <custom-component></custom-component>
    </body>
</html>
Now, let’s modify the custom-component.js file like so.
customElements.define('custom-component', class extends HTMLElement {
    constructor() {
        super();
        this.attachShadow({ mode: 'open' });
        this.shadowRoot.innerHTML = `
            <style>
                p {
                    color: red;
                }
            </style>
            <p>This is custom element</p>
        `;
    }
});
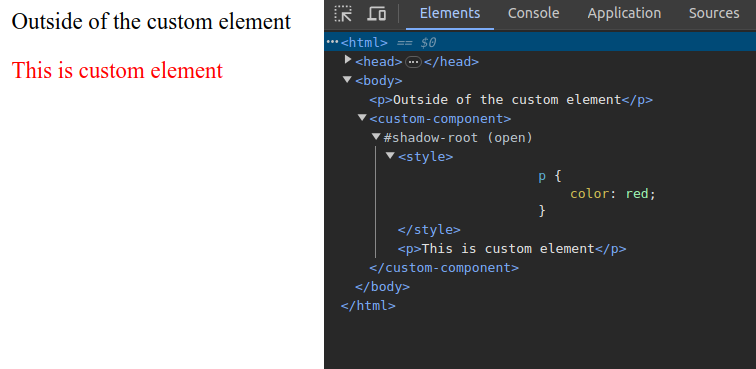
As you can tell, we can access the Shadow DOM of the custom element using the shadowRoot property and specifying the mode as open. The mode can be either open or closed. If you specify the mode as open, you can access the Shadow DOM of the custom element from outside of the custom element. If you specify the mode as closed, you can’t access the Shadow DOM of the custom element from outside of the custom element.
Next, we are setting the innerHTML property of the shadowRoot to the HTML that we want to render inside the custom element. As you can tell, we are rendering a <p> tag with the text This is custom element inside the custom element.
Notice that, the styles we’ve applied to the <p> tag will only apply to the <p> tag inside the custom element and not to the <p> tag outside of the custom element which is great if you don’t want to pollute the global styles.
Here’s what the HTML looks like in the browser.
In conclusion
And that was just the tip of the iceberg. There’s a lot more to Web Components than what we’ve covered in this article. You can learn more about Web Components on MDN.
And if you want examples of Web Components, you can check out this GitHub repository called Web Components Examples.
Like this article? Consider leaving a
Tip
👋 Hi there! I'm Amit. I write articles about all things web development. You can become a sponsor on my blog to help me continue my writing journey and get your brand in front of thousands of eyes.